3 Ways to Record a Webinar on Windows or Mac
SOURCE: https://www.vidpaw.com/topics/record-webinar.html
A webinar, short for "web-based seminar", basically is a type of web conference that allows a presenter or host to give an interactive presentation and convey knowledge with webinar attendees in real-time.
As an incredibly flexible and reliable tool, Webinars have been valued by businessmen to reach out to people across the world. Also, people use a webinar to hold online meetings. Webinar basically offers a chance to work on projects in real-time without teams having to be present in the same geographical location.
When attending a great webinar, has it crossed your mind to record a webinar for your own reference later or to share the content with others? This article will show you three different ways to record a Webinar.

CONTENTS
Way 1. Record a Webinar with RecordAnyVid
Way 2. Record a Webinar with QuickTime on Mac
Way 3. Record a Webinar with Xbox Game Bar on Windows 10
While recording a webinar, RecordAnyVid provides you with features like drawing and adding annotations. After recording a webinar, this screen recorder also provides many useful editing tools to enhance your webinar video.
* Multiple choice of export options, including WMV, MP4, MOV, F4V
* Support post-production editing tools
* Can record both your screen and webcam at the same time
* You can also schedule your recordings.
Read on to see how to record a Webinar with RecordAnyVid.
STEP 1. Download and Install RecordAnyVid
Navigate to RecordAnyVid's product page, and then choose a suitable version to download and install on your computer.
STEP 2. Set Up Your Recording
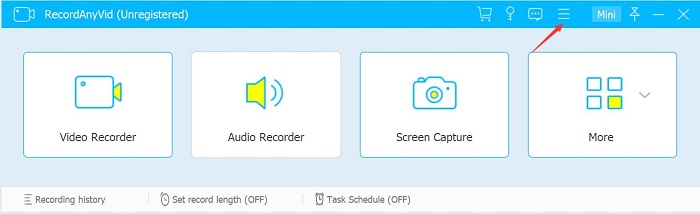
Before the webinar or online meeting starts, navigate to the webinar page for preparing. And then launch RecordAnyVid. There are four divided sections on RecordAnyVid's interface.
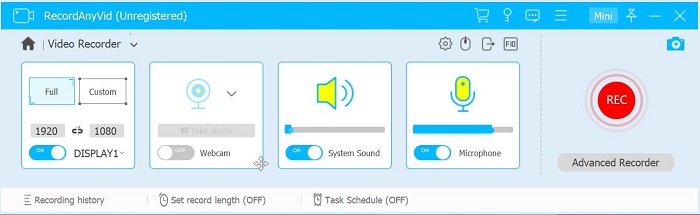
Click on "Video Recorder", here you can select to record full screen or a specific region. Also, you can decide whether to record system sound and microphone sound. Be sure that you set up the desired volume to record your video conference or online meeting.
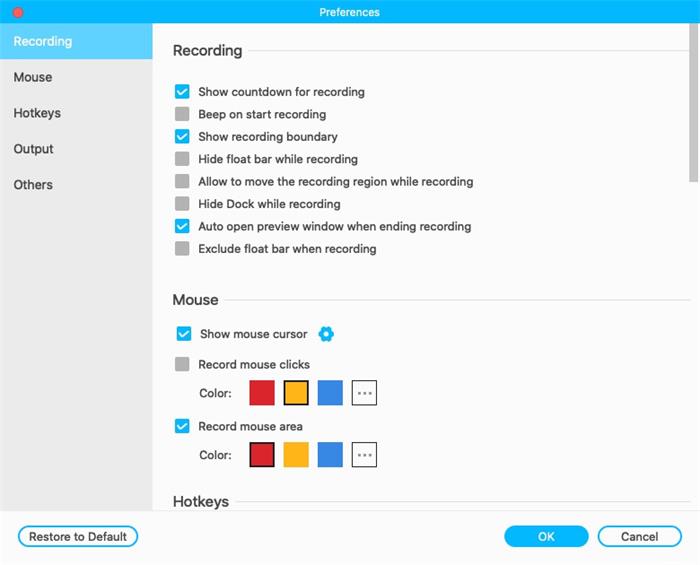
Before you record a webinar, you can also click on the gear icon to adjust your settings. For example, you can change the output format and quality of your screen recordings and the output location for your webinar recordings.
STEP 3. Record Your Webinar
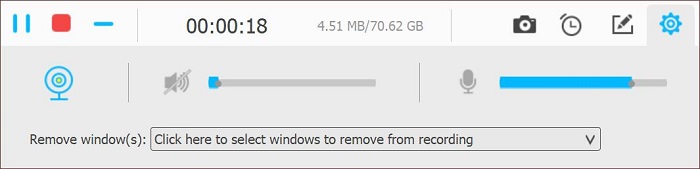
When the webinar starts, press the "REC" button and RecordAnyVid will start recording your selected area after a three-sound countdown. In the control bar, you can add annotations to your screen while recording your webinar. To finish recording when the webinar ends, click on the stop icon.
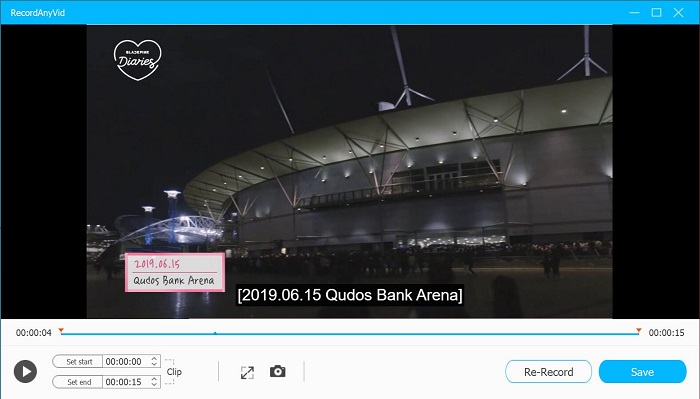
STEP 4. Edit and Save Your Webinar
Now you can preview your entire webinar video recording and cut out unwanted sections in the editor window. Also, you can choose to save a screenshot from your video conference recording. To save your webinar recording, just click "Save" and then choose an output folder for your webinar recording. Now you have a backup copy for your online meeting.
STEP 1. Launch the QuickTime Player app on your Mac, select "File" > "New Screen Recording" to open screen recorder and display the tools. If you want to set the area where you want to record your webinar video, just click "Options" to control.

STEP 2. Click "Record" and QuickTime will start to capture your webinar. Click the stop button in the menu bar to end recording your webinar or online meeting. Depending on where you chose to save the webinar recording, an app may open.

Before you record a webinar with Xbox Game Bar, it is necessary to mention that Xbox Game Bar doesn't support you to record the entire screen, which means you can only record one window/app at a time. Also, there is a time limit on recording videos with Xbox Game Bar.
STEP 1. Open the Start menu and then go to "All apps" > "Xbox" to set up your Xbox app.
STEP 2. Check if you enable the Xbox Game Bar feature by going to "Settings" > "Gaming" > "Game Bar", and check "Record game clips"
STEP 3. Switch to "Settings" > "Gaming > "Game DVR", and adjust your audio quality, video quality, and output location.
STEP 4. When you're ready to record, press the hotkeys "Win+G" to open the Xbox Game Bar. There is a screen recorder panel that lets you capture your screen. Or you can directly press "Win+Alt+R" to start record a webinar.
STEP 5. Click on the stop icon to finish recording, then you can find your webinar recordings in Videos > Captures.
A webinar, short for "web-based seminar", basically is a type of web conference that allows a presenter or host to give an interactive presentation and convey knowledge with webinar attendees in real-time.
As an incredibly flexible and reliable tool, Webinars have been valued by businessmen to reach out to people across the world. Also, people use a webinar to hold online meetings. Webinar basically offers a chance to work on projects in real-time without teams having to be present in the same geographical location.
When attending a great webinar, has it crossed your mind to record a webinar for your own reference later or to share the content with others? This article will show you three different ways to record a Webinar.
CONTENTS
Way 1. Record a Webinar with RecordAnyVid
Way 2. Record a Webinar with QuickTime on Mac
Way 3. Record a Webinar with Xbox Game Bar on Windows 10
Way 1. Record a Webinar with RecordAnyVid
Using a screen recorder is an effective way to record a Webinar or video conference. RecordAnyVid is a versatile screen recording tool to capture your screen and webcam or record audio. This tool is also extremely helpful in the situation that you attend an important video conference and want to record this video conference to refer to later.While recording a webinar, RecordAnyVid provides you with features like drawing and adding annotations. After recording a webinar, this screen recorder also provides many useful editing tools to enhance your webinar video.
Highlights of RecordAnyVid
* Ad-free, no watermark, and well-designed interface* Multiple choice of export options, including WMV, MP4, MOV, F4V
* Support post-production editing tools
* Can record both your screen and webcam at the same time
* You can also schedule your recordings.
Read on to see how to record a Webinar with RecordAnyVid.
STEP 1. Download and Install RecordAnyVid
Navigate to RecordAnyVid's product page, and then choose a suitable version to download and install on your computer.
STEP 2. Set Up Your Recording
Before the webinar or online meeting starts, navigate to the webinar page for preparing. And then launch RecordAnyVid. There are four divided sections on RecordAnyVid's interface.
Click on "Video Recorder", here you can select to record full screen or a specific region. Also, you can decide whether to record system sound and microphone sound. Be sure that you set up the desired volume to record your video conference or online meeting.
Before you record a webinar, you can also click on the gear icon to adjust your settings. For example, you can change the output format and quality of your screen recordings and the output location for your webinar recordings.
STEP 3. Record Your Webinar
When the webinar starts, press the "REC" button and RecordAnyVid will start recording your selected area after a three-sound countdown. In the control bar, you can add annotations to your screen while recording your webinar. To finish recording when the webinar ends, click on the stop icon.
STEP 4. Edit and Save Your Webinar
Now you can preview your entire webinar video recording and cut out unwanted sections in the editor window. Also, you can choose to save a screenshot from your video conference recording. To save your webinar recording, just click "Save" and then choose an output folder for your webinar recording. Now you have a backup copy for your online meeting.
Way 2. Record a Webinar with QuickTime on Mac
Although RecordAnyVid offers a Mac OS version for Mac users, you can use its built-in QuickTime Player app to record a webinar or record a video conference or video meeting.STEP 1. Launch the QuickTime Player app on your Mac, select "File" > "New Screen Recording" to open screen recorder and display the tools. If you want to set the area where you want to record your webinar video, just click "Options" to control.
STEP 2. Click "Record" and QuickTime will start to capture your webinar. Click the stop button in the menu bar to end recording your webinar or online meeting. Depending on where you chose to save the webinar recording, an app may open.
Way 3. Record a Webinar with Xbox Game Bar on Windows 10
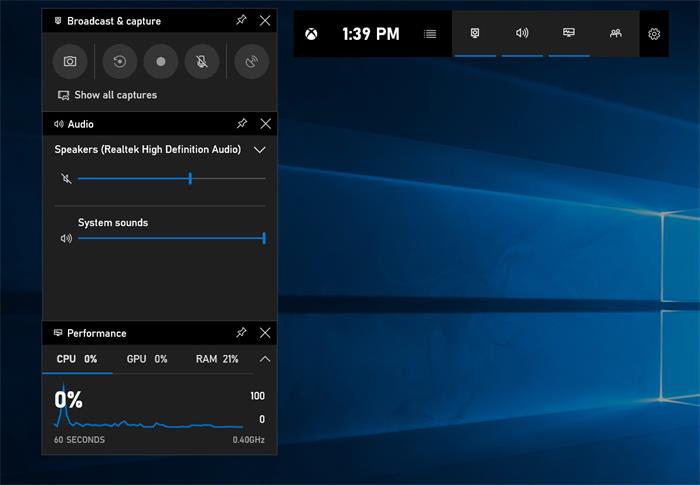
Windows 10 has an Xbox Game Bar feature which allows you to record a webinar or record a video conference without installing extra software.Before you record a webinar with Xbox Game Bar, it is necessary to mention that Xbox Game Bar doesn't support you to record the entire screen, which means you can only record one window/app at a time. Also, there is a time limit on recording videos with Xbox Game Bar.
STEP 1. Open the Start menu and then go to "All apps" > "Xbox" to set up your Xbox app.
STEP 2. Check if you enable the Xbox Game Bar feature by going to "Settings" > "Gaming" > "Game Bar", and check "Record game clips"
STEP 3. Switch to "Settings" > "Gaming > "Game DVR", and adjust your audio quality, video quality, and output location.
STEP 4. When you're ready to record, press the hotkeys "Win+G" to open the Xbox Game Bar. There is a screen recorder panel that lets you capture your screen. Or you can directly press "Win+Alt+R" to start record a webinar.
STEP 5. Click on the stop icon to finish recording, then you can find your webinar recordings in Videos > Captures.


Comments
Post a Comment