Recommendation: The Best Screen Recorder on Mac
SOURCE: https://www.vidpaw.com/topics/best-screen-recorder-on-mac.html
A good screen recorder can help users to capture their screen activities within only simple clicks. There are many situations we may need a screen record. For example, we want to record the gaming processes down to share the victory with friends; capture a movie so that we can play it back later at any time we want; record the moment we spend with friends or family online such as have a video call on computer.
There are many screen recorders came out for people to choose from on the Internet. But today, we have sorted out the best one from the tens of even hundreds of screen recorders for Mac users, which is RecordAnyVid.
CONTENTS
Part 1. The Best Screen Recorder on Mac - RecordAnyVid
Part 2. FAQs on RecordAnyVid
1. Is RecordAnyVid Free?
2. Is RecordAnyVid Safe to Use?
3. What are the Differences between the Free Version and Registered Version?
4. Can I Use My Purchased License Code to Register Two Computer?
Part 3. How to Use RecordAnyVid to Record Any Screen Activities on Mac
Except for the above features, RecordAnyVid has more benefits that can be explored after using it for a while. If you are still not familiar with RecordAnyVid, in the following, you can figure out more about this program through the FAQs. Check them as well.
→ No virus and malware
There was no virus, malware, or malicious add-on in the software, so people don't need to worry that RecordAnyVid would bring some hidden dangers to the devices.
→ Protect privacy information
RecordAnyVid doesn't require users to give personal information before using the software. Also, it won't collect any of the users' private data without the permission from users. RecordAnyVid highly values users' privacy rights.
→ Won't drag down the computer speed
RecordAnyVid is a light-weight software, which won't give a large burden to the computer CPU and drag down the running speed of the device. The software is also simple, stable, and can act fluently. You would get a good recording experience using RecordAnyVid.
But if you pay for the family-use license code of RecordAnyVid, you can register the software for using on multiple PCs.
So if you need to use the registered RecordAnyVid on more PCs, it is recommended for you to purchase the family-use plan.
Macs
First, you can set the recording area according to the actual size of the video you are going to record.
Then, adjust the system as well as microphone volume to be the level you satisfy.
More advanced video/audio settings are in "Preferences". You can enter it by clicking the gear icon above the "Microphone" voice setting box.
After getting a full understanding of RecordAnyVid, why not go to the official site and download the software for starting your first recording? It would be the best choice for the Mac screen record, especially for beginners.
A good screen recorder can help users to capture their screen activities within only simple clicks. There are many situations we may need a screen record. For example, we want to record the gaming processes down to share the victory with friends; capture a movie so that we can play it back later at any time we want; record the moment we spend with friends or family online such as have a video call on computer.
There are many screen recorders came out for people to choose from on the Internet. But today, we have sorted out the best one from the tens of even hundreds of screen recorders for Mac users, which is RecordAnyVid.
CONTENTS
Part 1. The Best Screen Recorder on Mac - RecordAnyVid
Part 2. FAQs on RecordAnyVid
1. Is RecordAnyVid Free?
2. Is RecordAnyVid Safe to Use?
3. What are the Differences between the Free Version and Registered Version?
4. Can I Use My Purchased License Code to Register Two Computer?
Part 3. How to Use RecordAnyVid to Record Any Screen Activities on Mac
Part 1. Features on RecordAnyVid
RecordAnyVid is regarded as the best screen capture helper on Mac, with lots of highlighted features and helpful toolkit. Its main advantages can be concluded as the following.① Record any screen activities as you like
RecordAnyVid has no limitations on what kind of activities people want to record. Any type of screen acting can be recorded using it. For example, the video gaming moments, Facetime/Skype calls, online movies/TV shows, etc. can all be easily recorded with RecordAnyVid.② Personalized recording settings
Users can freely set the video/audio recordings just as they want, no matter the size of the video, or the volume of the audio. In addition, there are more advanced settings provided in the program for pro users to set if they need.③ Edit the recording following your preference
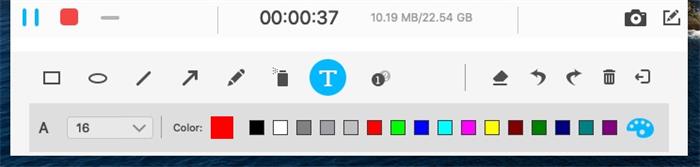
Even during the video recording, users are allowed to edit the video with some provided tools inside RecordAnyVid. During the recording, there is a drawing panel that users can make full use of to enable the recording look better. After the recording is ending, users can also trim or crop the video in the preview window, and save the perfect part they like the most.④ Easy to use and many shortcuts are provided
RecordAnyVid has a clean and simple interface, which allows users to use very easily. In addition, there is a shortcut function set in the program, in which users can set some hotkeys to use RecordAnyVid's functions more easily.Except for the above features, RecordAnyVid has more benefits that can be explored after using it for a while. If you are still not familiar with RecordAnyVid, in the following, you can figure out more about this program through the FAQs. Check them as well.
Part 2. FAQs on RecordAnyVid
As a new user, you may have some confusing problems about RecordAnyVid such as its security, performance, etc. You can figure out some confusion by reading these listed FAQs in this part.1. Is RecordAnyVid Free?
RecordAnyVid offers two versions - one is the free-trial version, and the other is a paid version. Users can enjoy all the basic functions of RecordAnyVid even without paying for it.2. Is RecordAnyVid Safe to Use?
RecordAnyVid is a completely safe software for the following reasons.→ No virus and malware
There was no virus, malware, or malicious add-on in the software, so people don't need to worry that RecordAnyVid would bring some hidden dangers to the devices.
→ Protect privacy information
RecordAnyVid doesn't require users to give personal information before using the software. Also, it won't collect any of the users' private data without the permission from users. RecordAnyVid highly values users' privacy rights.
→ Won't drag down the computer speed
RecordAnyVid is a light-weight software, which won't give a large burden to the computer CPU and drag down the running speed of the device. The software is also simple, stable, and can act fluently. You would get a good recording experience using RecordAnyVid.
3. What are the differences between the Free Version and Registered Version?
As mentioned above, RecordAnyVid has both free and registered version. There are two main differences between them, for example, each recording can only be up to 3 minutes in maximum, and users can't use the trim and crop function while previewing the recording. In addition, the full version can remove these two limitations. So if you don't have such needs, RecordAnyVid free version is appropriate for use.4. Can I Use My Purchased License Code to Register Two Computer?
There are two situations. First, if you have purchased the single-use license code, you can only register RecordAnyVid on one computer.But if you pay for the family-use license code of RecordAnyVid, you can register the software for using on multiple PCs.
So if you need to use the registered RecordAnyVid on more PCs, it is recommended for you to purchase the family-use plan.
Macs
Part 3. How to Use RecordAnyVid to Record Any Screen Activities on Mac
Now let's see how to record the Mac screen using RecordAnyVid below.STEP 1. Install RecordAnyVid on Mac
Navigate to VidPaw and find RecordAnyVid on the website. Remember to choose Mac version. Under Mac version, you would discover that both free and paid versions are provided there. It is recommended to use the free one if you are a new user of it.STEP 2. Open RecordAnyVid and Go to Video Recorder
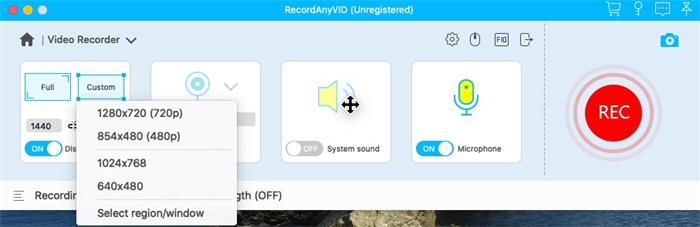
After installing RecordAnyVid for Mac, launch the program. On its interface, go to Video Recorder and you can make some pre-settings.First, you can set the recording area according to the actual size of the video you are going to record.
Then, adjust the system as well as microphone volume to be the level you satisfy.
More advanced video/audio settings are in "Preferences". You can enter it by clicking the gear icon above the "Microphone" voice setting box.
STEP 3. Start Recording
After the pre-settings are made, you can directly click the REC button on the right side of the Video Recorder in RecordAnyVid to start the recording immediately. You can draw or paint the video while recording with the drawing panel provided by RecordAnyVid, or you just need to wait for its done patiently.STEP 4. Save the Recording on Mac
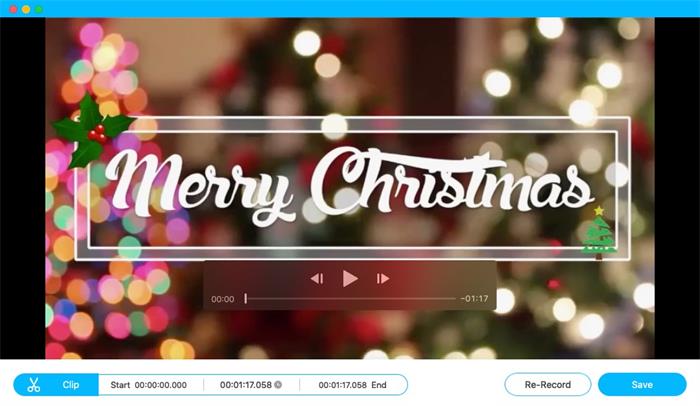
If the recording is ended, click the stop icon on the toolbar and you will be navigated to the previewing window. Here you can check if the recording suits your need, and you can also trim or crop the recording in your preference. After these are all done, just click "Save" to save the recording locally on Mac.After getting a full understanding of RecordAnyVid, why not go to the official site and download the software for starting your first recording? It would be the best choice for the Mac screen record, especially for beginners.


Comments
Post a Comment